Layout
Note: layout packages require Siberian 4.5.0 and above, otherwise they will not work
Here you'll find everything needed to start developing your first layout, from structure to update routine & packaging.
What is a layout ?
Layouts are the entry point of your Siberian Applications, they define your application homepage design.
Right here you can find a module skeleton to start with Siberian layout Skeleton

What you need
- A new idea for a cool UI to share !
- Knowledge about html/css/javascript
- Follow these instructions
And to define two names:
- Your package name, like
MyAwesomeLayout. - Your layout
code, which should be unique, and limited to 50 characters, likemy_awesome_layout.
These two names will follow you and ensure your layout is namespaced, avoiding conflicts with any other layout.
Side notes: Your layout should be compatible with most device resolutions, and orientations
Structure of a layout package
Layouts are installed in the app/local/modules folder,
for more information about the inheritance you can read module/core-inheritance
Below is the complete and minimal required structure for a layout as in the layout skeleton
MyAwesomeLayout.zip
├─ resources
│  ├─ db
│  │  └─ data
│  │     └─ my_awesome_layout.php
│  ├─ design
│  │  └─ desktop
│  │     └─ flat /** Flat design */
│  │        └─ images
│  │           └─ customization
│  │              └─ layout
│  │                 └─ homepage
│  │                    └─ my_awesome_layout.png
│  └─ var
│     └─ apps
│        └─ modules
│           └─ layout
│              └─ home
│                 └─ my_awesome_layout
│                    ├─ hooks.js
│                    ├─ style.css
│                    └─ view.html
├─ init.php
├─ package.json
└─ [...]
package.json
The package.json is used by the Installer to know the requirements, and routines to run during the installation/update process of your layout
{
  "name": "MyAwesomeLayout",
  "description": "MyAwesomeLayout description",
  "type": "layout",
  "version": "1.0",
  "release_note": {
    "url": "http://www.yourdomain.com/your-layout.html",
    "show": true
  },
  "dependencies": {
    "system": {
      "type": "SAE",
      "version": "4.5.0"
    }
  }
}
| Field | Required ? | Description |
|---|---|---|
| name | yes | Package name, avoid spaces and numbers as this is also your Class name & Folder name in app/local/modules/MyAwesomeLayout/[...] |
| description | yes | Package description |
| type | yes | must be layout |
| version | yes | Your layout version, for updates |
| release_note | no | url: link to a valid HTML description to be shown in the modal when installing, show: (true/false) to force display |
| dependencies | yes | version*: 4.5.0 minimum, type: SAE/MAE/PE minimum installation type required |
* version must be at least 4.5.0
Init
The new init syntax is available from Siberian 4.13, this new syntax avoids conflicts with already exisiting bootstrap classes
The file init.php is used to hook & register the layout files into Siberian & update assets.
However the syntax & methods used inside Init remains the same as with the older bootstrap files.
<?php

$init = function($bootstrap) {
    # Register assets
    # This path must be "/app/local/modules/MyAwesomeLayout/resources/var/apps/"
    # Where "MyAwesomeLayout" is your layout package name #what-you-need
    \Siberian_Assets::registerAssets(
        "MyAwesomeLayout",
        "/app/local/modules/MyAwesomeLayout/resources/var/apps/"
    );

    # Hook javascript to index.html
    # These path are relative to the previously defined before:
    # "/app/local/modules/MyAwesomeLayout/resources/var/apps/"
    \Siberian_Assets::addJavascripts(array(
        "modules/layout/home/my_awesome_layout/hooks.js",
    ));

    # Hook stylesheets to index.html
    # These path are relative to the previously defined before:
    # "/app/local/modules/MyAwesomeLayout/resources/var/apps/"
    \Siberian_Assets::addStylesheets(array(
        "modules/layout/home/my_awesome_layout/style.css",
    ));

    # Register a custom form for the Layout Options
    \Siberian_Feature::registerLayoutOptionsCallbacks("my_awesome_layout", "MyAwesomeLayout_Form_MyAwesomeLayout", function($datas) {
        $options = array();

        return $options;
    });
};
$bootstrap is a reference to the Zend Bootstrap if you need to hook it.
Icon & Image sizing
Available from version 4.7.10
If your layout requires custom ratio images to illustrate features, you can register a callback function in the init.php to be called like this.
\Siberian_Feature::registerRatioCallback("my_awesome_layout", function($position) {
    $sizes = array(
        "width" => 800,
        "height" => 400,
    );

    return $sizes;
});
my_awesome_layout is your unique layout code.
$position is the position of the current feature, this way you can have different sizes for different positions in your layout.
the function must return an array with width and height keys.
Data
This file creates & updates the entry in database and copy assets at installation time
If you need to change options in your module while providing an update you must change the values here
Note: you must never change code as this is the unique_code used to update your layout, otherwise this will create a new layout.
<?php
/** Available in Siberian 4.8.6+ only */
$default_options = \Siberian_Json::encode(array(
    "borders" => "border-right",
    "borders" => "border-left",
    "borders" => "border-top",
    "label" => "label-left",
    "textTransform" => "title-lowcase",
));

# MyAwesomeLayout
$datas = array(
    'name'                       => 'MyAwesomeLayout',
    'visibility'                 => \Application_Model_Layout_Homepage::VISIBILITY_HOMEPAGE,
    'code'                       => 'my_awesome_layout',
    /** Preview is relative to [...]/resources/design/desktop/[flat|siberian]/images/  */
    'preview'                    => '/customization/layout/homepage/my_awesome_layout.png',
    'use_more_button'            => 1,
    'use_horizontal_scroll'      => 0,
    'number_of_displayed_icons'  => 8,
    'position'                   => "bottom",
    "order"                      => 1200,
    "is_active"                  => 1,
    "use_subtitle"               => 1,
    "use_homepage_slider"        => 1,
    "options"                    => $default_options,
);

$layout = new \Application_Model_Layout_Homepage();
$layout
    ->setData($datas)
    ->insertOrUpdate(array("code"));

# Copying assets at installation time
# same path as in `Siberian_Assets::registerAssets`
\Siberian_Assets::copyAssets("/app/local/modules/MyAwesomeLayout/resources/var/apps/");
| Field | Required ? | Description |
|---|---|---|
| name | yes | This is your layout name, this can be My Awesome Layout |
| visibility | yes | VISIBILITY_HOMEPAGE, VISIBILITY_ALWAYS, VISIBILITY_TOGGLE |
| code | yes | must be your layout_code, here my_awesome_layout |
| preview | yes | This is the image used in Design > CHOOSE YOUR LAYOUT section |
| use_more_button | yes | Does your layout works with a modal and so requires the more_button |
| use_horizontal_scroll | yes | - |
| number_of_displayed_icons | yes | The number of features used when using use_more_button this populates features.overview.options |
| position | yes | Position of your menu: bottom, left, right |
| order | yes | The order in the section Design > CHOOSE YOUR LAYOUT |
| is_active | yes | must be 1 |
| use_subtitle | yes | Whether your layout uses subtitles. /!\ Only available in flat design |
| use_homepage_slider | no | Whether your layout is designed to work with the homepageslider. |
| options | no | Default options for your layout Siberian 4.8.6+ only |
Visibility
| VISIBILITY_HOMEPAGE | The layout is displayed only on the homepage | 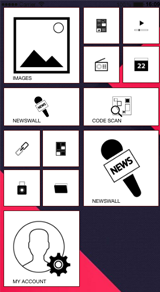 |
| VISIBILITY_ALWAYS | The layout is displayed everywhere and must take in consideration audio player controls & features UI | 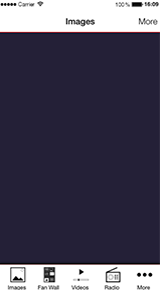 |
| VISIBILITY_TOGGLE | Toggle layout side-menu | 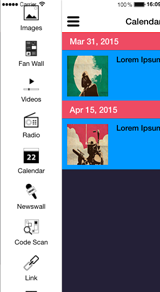 |
Layout Structure
The layout is composed of 3 or 4 files generally, view.html, style.css, hooks.js & if needed modal.html
view.htmlThis is the main layout view.style.cssAll the corresponding CSS for yout layouthooks.jsThis file contains every hooks to tell Ionic what to load & how to arrange featuresmodal.htmlIf you need to customize the modal this is the file you are searching for otherwise you can use one of the existing modal from Siberian.
view.html
<div class="layout my_awesome_layout">
    <ul id="container">
        <li class="item homepage-custom"
            ng-class="{ 'background-transparent' : tabbar_is_transparent, 'no-border' : tabbar_is_transparent }"
            ng-show="tabbar_is_visible"
            tabbar-items
            ng-repeat="feature in features.overview.options"
            option="feature"
            go-to-url="goTo(feature);">

            <img ng-src="{{ feature.icon_url }}" />
            <h2>{{ feature.name }}</h2>
            <p ng-if="feature.subtitle">{{ feature.subtitle }}</p>
        </li>
    </ul>
</div>
Your homepage layout needs to be wrapped into a <div> with at least two classes first is layout, second is my_awesome_layout.
Each feature is an item and needs some directives:
| Element | Required ? | Description |
|---|---|---|
| tabbar-items | yes | This directive binds the on-click of your element |
| option="feature" | yes | Sets the option to the current feature |
| go-to-url="goTo(feature);" | yes | This option is deprecated in Siberian 5.0 |
| ng-show="tabbar_is_visible" | yes | Condition used when the layout is always displayed |
| ng-class="[...]" | yes | Used by the option in Editor > Colors > Homepage > Transparent to remove border & background |
Elements also use CSS classes to bind their colors upon the application defined color set
| Class | Required ? |
|---|---|
| item | yes |
| homepage-custom | yes |
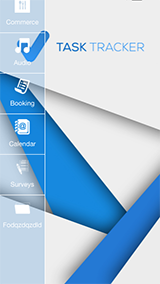
| Classic |
|---|
   |
style.css
This CSS is the example given in the layout skeleton but with my_awesome_layout as namespace
.layout.my_awesome_layout {
    position: absolute;
    bottom: 5vh;
    width: 100%;
}

.layout.my_awesome_layout li.item {
    height: 28px;
    width: 150px;
    border-radius: 0 14px 14px 0;
    padding: 0;
    -o-transform: rotate(-7deg);
    -ms-transform: rotate(-7deg);
    -webkit-transform: rotate(-7deg);
    transform: rotate(-7deg);
    margin-left: -4vw;
    margin-top: 1px;
    border-width: 0px;
}

.layout.my_awesome_layout li.item img {
    float: left;
    height: 80%;
    margin: 2% 0 0 10%;
}

.layout.my_awesome_layout li.item h2 {
    float: left;
}
hooks.js
The hooks.js file is an Angular service, lazy loaded when using a custom Layout, allowing to manipulate features.
/**
 *
 * MyAwesomeLayout example
 *
 * All the following functions are required in order for the Layout to work
 */
App.service('my_awesome_layout', function ($rootScope, HomepageLayout) {

    var service = {};

    var _features;

    /**
     * Must return a valid template
     *
     * @returns {string}
     */
    service.getTemplate = function() {
        return "modules/layout/home/my_awesome_layout/view.html";
    };

    /**
     * Must return a valid template
     *
     * @returns {string}
     */
    service.getModalTemplate = function() {
        return "templates/home/l10/modal.html";
    };

    /**
     * onResize is used for css/js callbacks when orientation change
     */
    service.onResize = function() {
        /** Do nothing for this particular one */
    };

    /**
     * Manipulate the features objects
     *
     * Examples:
     * - you can re-order features
     * - you can push/place the "more_button"
     *
     * @param features
     * @param more_button
     * @returns {*}
     */
    service.features = function(features, more_button) {
        /** Keep a copy of the features in your hook */
        _features = features;

        /** Place more button at the end */
        features.overview.options.push(more_button);

        return features;
    };

    return service;

});
| Function | Description |
|---|---|
| service.getTemplate | Must return the path to the layout file |
| service.getModalTemplate | Must return the path to a valid modal file |
| service.onResize | Called when device orientation is changed or resized and everytime the homepage is shown |
| service.features | Called to manipulate features |
- Default modal templates are
templates/home/l10/modal.html&templates/home/modal/view.html
Available objects in hook service
features
"features": {
  "layoutCode": "my_awesome_layout",
  /** an array of every features in your application see [Option](#option) */
  "options": [...]
}
Chunk of features defined by the limit
features.overview
"features.overview": {
  "layoutCode": "my_awesome_layout",
  /** an array of every features in your application see [Option](#option) */
  "options": [...]
}
Option
Example of an option/feature for information
{
  "value_id": "6",
  "id": 6,
  "layout_id": "1",
  "code": "calendar",
  "name": "Calendar",
  "is_active": "1",
  "url": "http://www.yourdomain.com/57c7f8764a65a/event/mobile_list/index/value_id/6",
  "path": "/57c7f8764a65a/event/mobile_list/index/value_id/6",
  "icon_url": "http://www.yourdomain.com/var/cache/images/e9dcc367471a70a23261056b1129a198.png",
  "icon_is_colorable": "1",
  "is_locked": null,
  "is_link": false,
  "use_my_account": "0",
  "use_nickname": "0",
  "use_ranking": "0",
  "custom_fields": [],
  "position": "5"
}
Other service.features = function(features, more_button) examples
In the example below, we are placing the more_button at the third place in the features.overview.options array.
[...]
    /**
     * Example with a layout containing 5 features (more_button include) & a modal
     */
    service.features = function(features, more_button) {
        if(features.overview.options >= 4) {

            var third_option = features.overview.options[2];
            var fourth_option = features.overview.options[3];

            /** Placing more button at the third place (middle in layout) */
            features.overview.options[2] = more_button;
            features.overview.options[3] = third_option;
            features.overview.options[4] = fourth_option;

            /** Removing 4 first option for the modal */
            features.options = features.options.slice(4, features.options.length);

        } else {
            features.overview.options.push(more_button);
        }

        return features;
    };
[...]
The second example is used by the Apartments layout to create chunks of features.
[...]
    service.features = function(features, more_button) {
        _features = features;

        var more_options = features.options.slice(12);
        var chunks = new Array();
        var i, j, temparray, chunk = 2;
        for (i = 0, j = more_options.length; i < j; i += chunk) {
            temparray = more_options.slice(i, i + chunk);
            chunks.push(temparray);
        }
        features.chunks = chunks;

        return features;
    };
[...]
Layout Options
In the version 4.8.6 we introduced new Layout options, you can offer easy customization of your layouts to the final user with a simple form.
If you want to add custom options to your layout you must create a Form and register it in your init.
MyAwesomeLayout.zip
└─ Form
   └─ MyAwesomeLayout.php
Init hook
# Register a custom form for the Layout Options
Siberian_Feature::registerLayoutOptionsCallbacks("my_awesome_layout", "MyAwesomeLayout_Form_MyAwesomeLayout", function($datas) {
    $options = array();

    return $options;
});
Form options
Here is a simple example of what the form could look (from Layout 18).
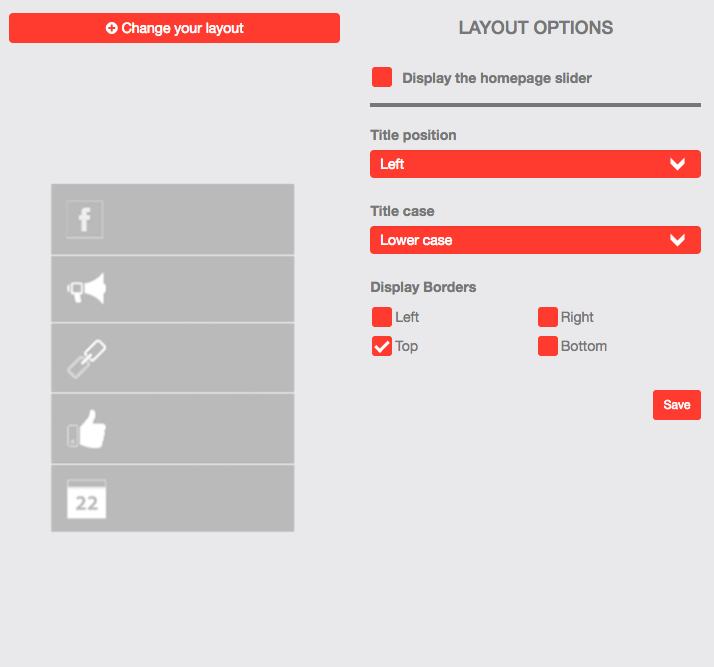
And the example code
<?php

class MyAwesomeLayout_Form_MyAwesomeLayout extends Siberian_Form_Options_Abstract {


    public function init() {
        parent::init();

        /** Bind as a create form */
        self::addClass("create", $this);
        self::addClass("form-layout-options", $this);

        $label = $this->addSimpleSelect("label", __("Title position"), array(
            "label-left" => __("Left"),
            "label-right" => __("Right"),
        ));

        $textTransform = $this->addSimpleSelect("textTransform", __("Title case"), array(
            "title-lowcase" => __("Lower case"),
            "title-uppercase" => __("Upper case"),
        ));

        $borders = $this->addSimpleMultiCheckbox("borders", __("Display Borders"), array(
            "border-left" => __("Left"),
            "border-right" => __("Right"),
            "border-top" => __("Top"),
            "border-bottom" => __("Bottom"),
        ));

        $this->addNav("submit", __("Save"), false, false);

        self::addClass("btn-sm", $this->getDisplayGroup("submit")->getElement(__("Save")));

    }

}
Your form MUST extend Siberian_Form_Options_Abstract class.
Then you can add your options.
style.css
And the view.html & style.css examples
Here in the style.css we are using classes with the same names as the form values below, this is one way of doing it.
[...]
.layout.layout_siberian_18 .label-right {
    text-align: right;
}
.layout.layout_siberian_18 .label-left {
    text-align: left;
}

.layout.layout_siberian_18 .title-lowcase {
    text-transform: inherit;
}
.layout.layout_siberian_18 .title-uppercase {
    text-transform: uppercase;
}
[...]
view.html
And then in the view.html
<div class="layout layout_siberian_18">
    <ion-content direction="y"
                 scrollbar-y="false"
                 class="scroll-view ionic-scroll">
        <div ng-repeat="feature in features.options">
            <a tabbar-items
               class="item item-avatar item-avatar-square homepage-custom border-custom {{ features.layoutOptions.borders.join(' ') }}"
               option="feature"
               go-to-url="goTo(feature)"
               ng-class="{ 'no-border': tabbar_is_transparent }">
                <img ng-src="{{ feature.icon_url }}" />
                <h2 class="{{ features.layoutOptions.label+' '+features.layoutOptions.textTransform }}">{{ feature.name }}</h2>
                <span ng-if="feature.code == 'push_notification' && push_badge"
                      class="badge badge-assertive">{{ push_badge }}</span>
            </a>
        </div>
    </ion-content>
</div>
Here we are using a simple javascript "join" to concatenate all the selected options which have the same classes names.
For the multi-select
{{ features.layoutOptions.borders.join(' ') }}
And for the simple selects we only echo the class, or classes
{{ features.layoutOptions.label+' '+features.layoutOptions.textTransform }}
Advanced usage of the options
In the layout swiper, we are using the options to configure the Slider javascript object
Here is an example of how we do it.
in our hooks.js file, within the onResize function
/**
 * onResize is used for css/js callbacks when orientation change
 */
service.onResize = function() {

    var options = _features.layoutOptions;
    /** Do nothing for this particular one */
    var time_out = ($rootScope.isOverview) ? 1000 : 200;

    $timeout(function() {
        if(swipe_instance != null && typeof swipe_instance.destroy == "function") {
            swipe_instance.destroy(true, false);
        }
        swipe_instance = new Swiper('.layout.layout_siberian_swipe .swiper-container', {
            direction: 'vertical',
            loop: (options.loop == "1") ? true : false,
            effect: 'coverflow',
            centeredSlides: true,
            initialSlide: (options.backcurrent == "1") ? service.last_index : 0,
            slidesPerView: 'auto',
            loopedSlides: 6,
            coverflow: {
                rotate: options.angle,
                stretch: options.stretch,
                depth: options.depth,
                modifier: 1,
                slideShadows : false
            }
        });

    }, time_out);
};
previously we saved the _features array in the features function, and thus can use it.
However, you can also access the layout options here
HomepageLayout.layoutOptions
Package
When you are done with your layout, it's time to pack !
zip everything at the root of your layout and you're done !
If you have created your own module from the skeleton, you can run ./tools.pack.sh and voila !
MyAwesomeLayout.zip
├─ resources
├─ init.php
└─ package.json
